Sunday, October 28, 2012

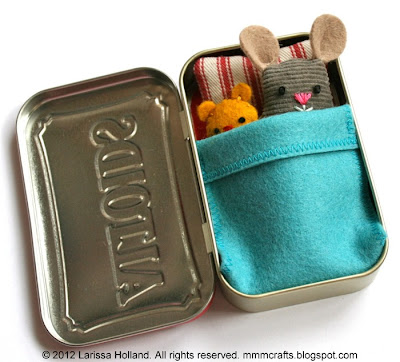
Tuck's Wee Mousie. Don't look, Erin.


Spoiling just a part of my great-nephew's third birthday gift. I had to cancel my trip to go to his party this weekend, so I'm taking his gifts along with me at Thanksgiving. Just couldn't sit on this part though. I love making Wee Mouses for small people. And the tins look so cute on top of wrapped gifts:


This mouse also has a bedtime story to read. It's about a three year old named Tucker who just maybe sometimes does not like to go to sleep. Written by me. Illustrated by me. Self published.


 "I very definitewy NOT tired," said a sleepy little Tucker.

 "No I not. Not even one (YAAAAWN) tiny tiny meeny miney bit."

 "Mmmph. Zifferlin. Shez iz im. Sfnn."


Tiny things make me happy. Happy birthday, Tuck Tuck! I love you!

Monday, October 22, 2012

needle books in the shop!

More details on each at the shop.

Update: There is a pattern available for this now: the Flora Needle Book pattern, available for instant download at Etsy and Craftsy.

Sunday, October 21, 2012

fair warning: last six needle books of the year will list soon


Do your sewing or quilting needles need a colorful home? I'm listing six handmade needle books in my etsy shop on Monday, Oct 22nd around 10 a.m. EST. I say that as a home school mom, with no guarantees implied - I will list them as close to that time as I'm able, barring any unforeseen things like children vomiting or the house catching fire.


These are the last needle books for 2012. I'll revisit them next year after the holiday craziness winds down. I find I'm much busier this school year with the girls in third and fifth grade (but it's a fun kind of busy) so I'm anticipating a painful shortage of creative time between now and the new year. I'd really love to get a pattern or two out before Christmas, but we'll see how it goes. (Yes, dearest Kate. I haven't forgotten! LOL)

Saturday, October 20, 2012

feliz aniversário, Robyn, part 3


Ok, so Robyn already bought this DIY papercut set from Elsita months ago, but I knew she would not get around to cutting them out for herself to enjoy before she draws Social Security anytime soon. She's got way too much going on to sit down and do that for herself these days. So I bought the set and took it upon myself to do it for her.

Because it's FUN.


However, I would not attempt this as your first papercutting DIY. Elsita has some simpler ones to do if you browse her shop. This set was challenging at times for me, even with my many years of wielding an X-acto. It's mostly due to the overall scale, which is pretty small, and all the tiny, tiny detail. Which is of course what makes the finished papercut so satisfying.

The set comes printed on some really nice, creamy stock, with pink printed on all the areas you cut away. I recommend you start with a brand new blade, good light, and a calm spirit (read: no espresso). I cut out the tiniest interior pieces first, then the last thing I do is cut around the outside.


So here's the completed set, mounted on dark grey 5x7 inch cardstock. I flipped them all over for mounting because as careful as you are, some pink is still visible in tiny places on the cutting side. Robyn's (gorgeous) home in Rio has many large, solid white walls, so I figured more artwork would be welcomed.

And, Bob dear, when you get your set cut out, guess who you are sending it tooooooo? LOL.

This completes the handmade portion of her birthday gift, which I sent to her along with a retail arty wall calendar. I'm glad I have a friend who loves handmade things as much as I do, so I can victimize her year after year with stuff like this. ;-) Love you, Robyn! Happy birthday! (waving)

Wednesday, October 17, 2012

feliz aniversário, Robyn, part 2


More T.O.U.C.s, this time for Robyn. She mentioned she liked them.


She really shouldn't do that unless she is prepared to receive some.


You can never have enough pin cushions. In my opinion. Crazy colors optional.

Materials are shot cottons, denim, wool felt, embroidery floss, poly stuffing, and rice for ballast. Pins not included. Stay tuned for the gripping third and final installment, feliz aniversário, Robyn, part 3.

Sunday, October 14, 2012

feliz aniversário, Robyn, part 1


We'll start with her birthday card and go from there. I love making birthday cards that can have an optional second life as wall art. I thought, tropical birds are very Rio. Right? Maybe not these specific birds. But I wasn't going for real life accuracy so much as fun color.

And maybe there are birds exactly like these in the Amazon rainforest, just waiting to be discovered.


The inside of the card is blue. The size of the card is 5x7 inches. The materials are archival art papers, gel glue, pop dots, and three black sequins.

I need to add a sizable 'thank you' here to Robyn's parents, who saved me having to brave the wilds of the Brazilian postal system by taking my gift to Robyn when they flew down to visit her recently. Thanks so much, wonderful Gages! My suitcase is your suitcase if I ever get to visit Rio myself.

Stay tuned for the next installment, feliz aniversário, Robyn, part 2.

Tuesday, October 2, 2012

notes on Kaley

For those of you who are wondering, here are some construction specs on Kaley Kitty.

1) She was created using the Katy Kitty pattern. You can alter your own Katy pattern to make a similar doll.


2) Unlike the Katy, she is one solid color in her body, arms and legs (except for her underwear). To achieve that I merged the separate pattern pieces for her arms into one piece by cutting off the seam allowance where they come together and then taping the pieces together. Then I did the same for the pieces for her legs.


3) I didn't do this, because I thought of it too late, but you can also merge the front head and body pieces using the same method. (The back body and head pieces will still have a seam at the neck because the back body pieces are split for the tail.)


4) If you want built-in underwear like Kaley's, sew the corduroy and a cotton print together before cutting out the body/head fabric, and be sure to mark the line of the underwear on the front and back body pattern pieces so you can line it up correctly at the seam for the front and back pieces. I marked mine 2 5/8 inches from the bottom for the top of the underwear.


5) After the front and back body fabric pieces were cut out, I topstitched some lace across the top of the underwear on the front and back pieces.

6) I altered her tail to be a gentle S curve instead of straight. Since her legs are all one color it helps her tail stand apart from her legs.


7) Her hospital gown is made from Katy's coat pattern, only without the collar and back detail. Since it is woven material instead of felt, I added a seam allowance along the bottoms, outside edge, and the cuffs of the sleeves. Adding 1/2 inch will give you enough to do a narrow hem. I also took off about 3/4 inch of the angle of the skirt to make it less full on both the front and back pattern pieces.


8) I didn't add a seam allowance along the neck. I used 1/4 inch double bias tape to finish the neck after the pieces were sewn together, with ten inches or so extra on one end for tying a bow. That's the end that will be in front on the gown. Where the gown crosses over there's a layer underneath that I secured with one sew-on snap hidden inside. I sewed the sleeve hems by hand because they were too small to fit under the machine. After the gown was finished, I opened the seam under one arm just enough to insert the opposite bias binding tie and then resewed the seam.


9) Her socks were made from a cotton knit T-shirt I have in my stash. I traced a U shape that was about 1 3/4 inches wide and 3 1/2 inches long on the knit that was layered right sides together, using the existing hem of the T-shirt as the top of the socks. I used a regular straight stitch to sew the seam on the line, trimmed the allowance to about 1/8 inch and turned them. Simple.


10) Low tack white tape and gauze can be used to bandage any boo boos. We had some on hand from my husband's many hospital stays. Poor guy.

And that is how I altered the Katy pattern to make Kaley. I hope you can use these tips if you would like to bless a sick child with a huggable friend.